10.如何自定义hugo主题页面输出格式?
**声明:**需要注意文章只提供思路,当处理一些复杂问题时可能需要变换思路,所以请根据自身情况选择是否阅读本篇文章。
因本人没学过go语言,所以大部分代码都交由AI编写,不排除代码可能存在隐患。
接下来我以自己使用的hugo-theme-relearn主题为例,讲解如何自定义康奈尔笔记页面输出格式。(hugo-theme-relearn主题)
工程目录结构
your-blog/
├── archetypes/
│   └── cornell-notes.md        # 笔记原型模板
├── layouts/
│   ├── cornell-notes/
│   │   └── views/
│   │       └── article.html    # 页面布局模板
│   ├── partials/
│   │   ├── cornell-notes.html  # 内容输出逻辑
│   │   └── custom-header.html  # 自定义样式表
│   └── shortcodes/
│       ├── cues.html           # 左侧标签短代码
│       ├── notes.html          # 右侧内容短代码
│       └── summary.html        # 底部总结短代码
└── static/
    └── images/
        └── cornell-img/
            ├── icon1.svg       # 右侧装饰图标
            ├── icon2.svg       # 左侧装饰图标
            └── watermark.jpg   # 底部背景图
功能实现全流程
具体需求
我想输出一个左侧写标签,右侧写内容,最底下显示写总结的“康奈尔笔记”页面,使用命令:
hugo new --kind cornell-notes learning/algorithm/_index.md创建.md文档后,md文件自动展示为如下格式:
  +++
  title = "{{ replace .Name "-" " " | title }}"
  type = "cornell-notes"
  date = {{ .Date }}
  draft = true
  +++

  {{% cues %}}
  写标签区域

  {{% /cues %}}

  {{% notes %}}
  写内容区域
  {{% /notes %}}

  {{% summary %}}
  总结区域
{{% /summary %}}当识别到短代码{{% cues %}}时,将{{% cues %}} {{% /cues %}}中的内容显示在标签一侧,剩下的依次类推。
样式定义
注意:假设自己的主题目录为your-blog,那么接下来的文件创建都该目录下,可参考目录结构。
创建 layouts/partials/custom-header.html(遇到没有的目录或文件请自行创建,下同,所以不再提示!!)
<style>
/* 康奈尔笔记容器 */
.cornell-notes {
  padding: 20px;
  margin: 15px 0;
  display: flex;
  flex-wrap: wrap;
  background: #f9f9f9;
  border-radius: 8px;
  box-shadow: 0 2px 4px rgba(0,0,0,0.1);
}

/* 左侧标签区 */
.cues {
  background: url('/images/cornell-img/icon2.svg') no-repeat 95% 20px;
  border-right: 2px dashed #ccc;
  flex: 1;
  padding-right: 25px;
  min-width: 250px;
}

/* 右侧内容区 */
.notes {
  background: url('/images/cornell-img/icon1.svg') no-repeat 5% 20px;
  border-left: 2px dashed #ccc;
  flex: 2;
  padding-left: 25px;
  min-width: 300px;
}

/* 底部总结区 */
.summary {
  width: 100%;
  clear: both;
  padding: 20px;
  margin-top: 20px;
  background: url('/images/cornell-img/watermark.jpg') center/cover;
  border-radius: 6px;
  position: relative;
}

/* 响应式适配 */
@media (max-width: 768px) {
  .cornell-notes {
    flex-direction: column;
  }
  .cues, .notes {
    border: none;
    padding: 15px 0;
  }
}
</style>
短代码开发
1.左侧标签区 (layouts/shortcodes/cues.html):
{{ $scratch := .Page.Scratch >}}
{{ $scratch.Set "cuesContent" ( .Inner | markdownify ) }}2.右侧内容区:(layouts/shortcodes/notes.html):
{{ $scratch := .Page.Scratch }}
{{ $scratch.Set "notesContent" ( .Inner | markdownify ) }}3.底部总结区:(layouts/shortcodes/summary.html):
{{ $scratch := .Page.Scratch }}
{{ $scratch.Set "summaryContent" ( .Inner | markdownify ) }}
页面样式
创建页面样式 layouts/partials/cornell-notes.html:
<div class="cornell-content">
  /*{{/* 初始化存储空间 */}}
  {{ .Scratch.Delete "cuesContent" }}
  {{ .Scratch.Delete "notesContent" }}
  {{ .Scratch.Delete "summaryContent" }}*/

  {{/* 触发短代码解析 */}}
  {{ $dummy := .Content }}

  {{/* 结构化输出 */}}
  <div class="cues-section">
    {{ with .Scratch.Get "cuesContent" }}
      <div class="cues-header">📌 关键标签</div>
      <div class="cues-body">{{ . | safeHTML }}</div>
    {{ else }}
      <div class="warning">⚠️ 未检测到标签内容</div>
    {{ end }}
  </div>

  <div class="notes-section">
    {{ with .Scratch.Get "notesContent" }}
      <div class="notes-header">📝 学习记录</div>
      <div class="notes-body">{{ . | safeHTML }}</div>
    {{ else }}
      <div class="warning">⚠️ 未检测到笔记内容</div>
    {{ end }}
  </div>

  <div class="summary-section">
    {{ with .Scratch.Get "summaryContent" }}
      <div class="summary-header">✨ 学习总结</div>
      <div class="summary-body">{{ . | safeHTML }}</div>
    {{ else }}
      <div class="warning">⚠️ 未检测到总结内容</div>
    {{ end }}
  </div>
</div>
页面内容输出逻辑
创建 layouts/cornell-notes/views/article.html:
<article class="cornell-notes">
  {{ partial "cornell-notes.html" . }}
</article>此处就是系统将自动调用了我们之前写的layouts/partials/cornell-notes.html文件,将内容输出到这个容器中。
实际效果如下:
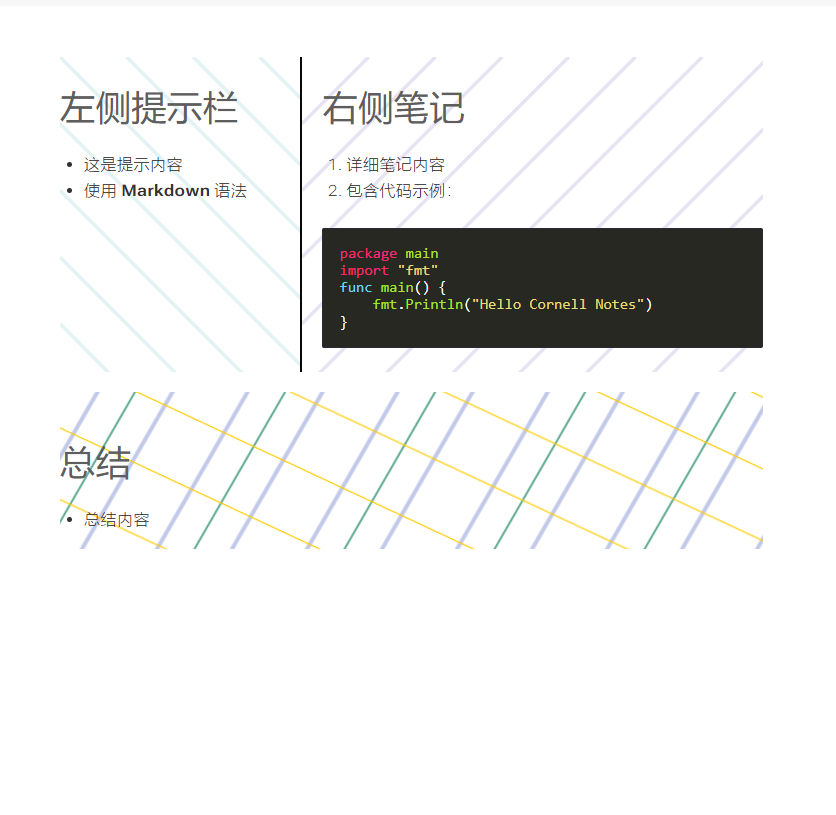
为了丰富页面你可以设置标题、页脚等显示样式,这些你使用的主题一般会提供,如我这里的:
<article class="cornell-notes">
  <header class="headline">
    {{partial "content-header.html" .}}
  </header>
  {{partial "heading-pre.html" .}}{{partial "heading.html" .}}{{partial "heading-post.html" .}}
  {{partial "cornell-notes.html" .}}

  <footer class="footline">
    {{partial "content-footer.html" .}}
  </footer>
</article>代码说明如下(都是基于我使用的主题,可不看):
1.从上而下,article容器的class值为cornell-notes,这个值在layouts/partials/custom-header.html中,这是之前编写页面布局时写的,此处调用该cornell-notes样式:
<article class="cornell-notes">
2.编写内容顶栏代码,如果项目未提供就自己创建一个,同样放地,放在layouts/partials/custom-header.html中,因此次使用主题自带故不再创建。当然,你也可以选择不写。
<header class="headline">
    {{partial "content-header.html" .}}
  </header>
对于标题设置:
{{partial "heading-pre.html" .}}{{partial "heading.html" .}}{{partial "heading-post.html" .}}页脚设置:
<footer class="footline">
    {{partial "content-footer.html" .}}
</footer>依实际需求而定,可写可不写。
3.总而言之,如果你只是输出之前需求的页面,那么可以只写这句代码:
<article class="cornell-notes">
  {{ partial "cornell-notes.html" . }}//就加了这句
</article>
{{ partial "cornell-notes.html" . }}这里就是去调用我们之前写的layouts/partials/cornell-notes.html文件,将内容输出到这个容器中。还记得吗?这个文件是我们写完短代码后写的文件,目的是将内容按照要求输出。
原型模板创建
我们在创建页面时,如果使用命令:
hugo new --kind cornell-notes log/cornell-notes/_index.md这个命令会自动创建一个archetypes/cornell-notes.md模型的文件,实现这一操作你需要先创建layouts/cornell-notes/views/article.html,这一操作在上面已经完成,接下来只需要创建archetypes/cornell-notes.md文件即可。值得注意的是无论是命令、还是layouts、archetypes文件下,都提到了cornell-notes这个名字,所以创建时留意名字需要相同。
这里小结这一思路:
- 在
layouts/[fileName]/views/article.html中编写页面输出逻辑。 - 在
layouts/[fileName].md中编写文件模版 - 使用命令
hugo new --kind [fileName] [path]生成模版文件
接下来是详细操作:
1.创建archetypes/cornell-notes.md文件:
  +++
  title = "{{ replace .Name "-" " " | title }}"
  type = "cornell-notes"
  date = {{ .Date }}
  draft = true
  +++

  {{% cues %}}
  写标签区域

  {{% /cues %}}

  {{% notes %}}
  写内容区域
  {{% /notes %}}

  {{% summary %}}
  总结区域
  {{% /summary %}}
2.使用方式
生成模版文件:
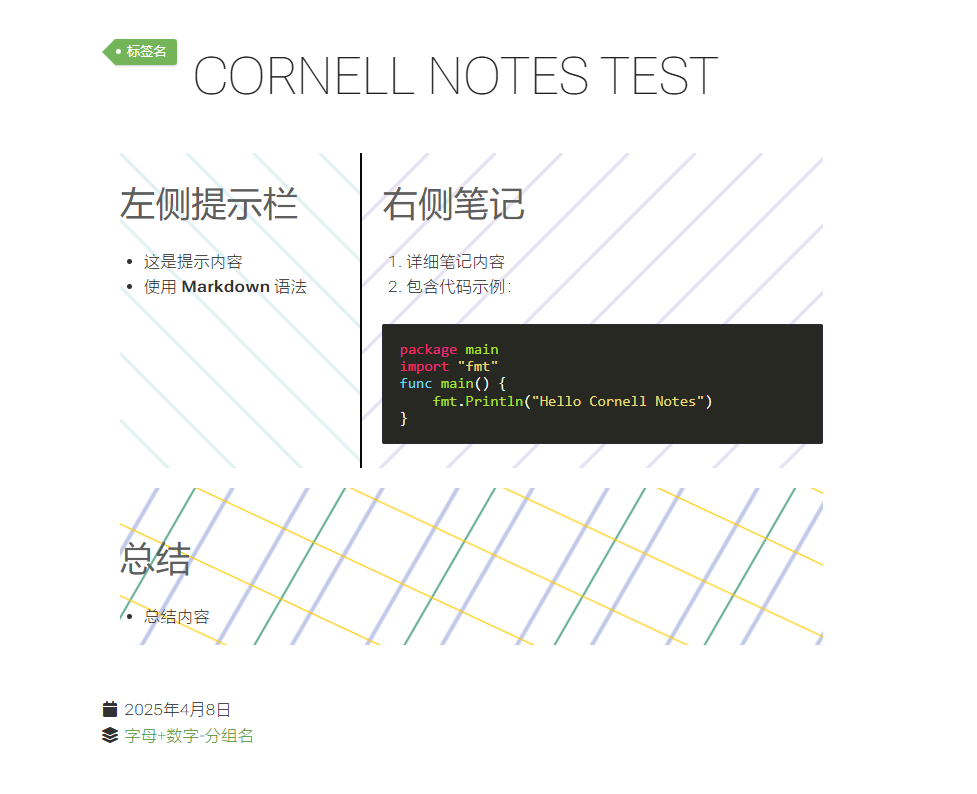
hugo new --kind cornell-notes learning/algorithm/_index.md实际效果图:
需要注意的是写模版文件的时候是依据你个人需求而定的,例如创建layouts/[fileName]/views/article.html这样的文件,在有些主题可能是layouts/partials/[fileName]/article.html,又如,此处md文件头部模版为:
+++
  title = "{{ replace .Name "-" " " | title }}"
  type = "cornell-notes"
  date = {{ .Date }}
  +++
而有些则是以:
  ---
    title = "{{ replace .Name "-" " " | title }}"
    archetype = "cornell-notes"
    date = {{ .Date }}
---旨在告诉你编写形式各不相同,所以清楚这一思路即可。要避免这些坑请结合主题的说明文档帮助查看。
总结
最后的最后做个总结,要想自定义hugo主题页面输出格式,你可以按照如下步骤展开:
- 确定需求,不会写代码让AI完成。
- 如果有需要请编写段代码。
- 编写输出逻辑,如果不会还请求助社区、AI等。
- 编写页面模板,参照以上思路,同时参考自己hugo主题的文档说明